
Step by Step Guide on Changing the Rotor of your Seiko Movement
To understand this guide, you need to understand what the rotor or counterweight is and what it does. It is a thin sheet of metal located at the back of the movement that spins as the watch wearer moves their hand. This spin creates energy and transfers it to the movement’s mainspring, also known as the power reserve. Basically, the rotor is the mechanism that keeps your watch running as long as you are wearing it.
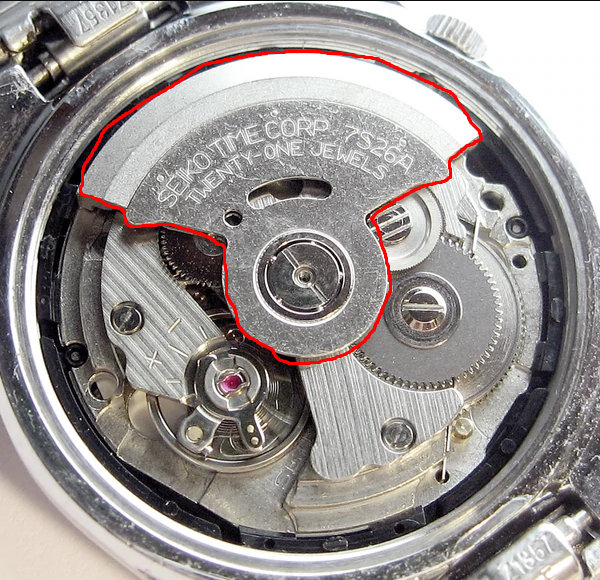
The watch rotor, marked by the crude red outline.
Being a part of the movement, and being located at the backside at that, this part is usually hidden and is not allotted much time for designing. Any correctly sized sheet of metal will do well as a rotor but as you may have read from this article, some companies like to show off their movements with a glass display caseback.
The most common movement used for Seiko modding, the NH35 and NH36, do not have very fancy rotors. In fact they are almost sterile if not for the engravings “NH35A. TWENTY-FOUR JEWELS SII”. The good news; you can very easily replace the rotor to a design that you like, and below is a detailed guide on how you can achieve this.
And by the way, these steps are not exclusive to the NH35 and NH36 - they also work for a wide range of other Seiko diver movements like the 7S26, 4R36, 7002, 6309 and others.
Without further ado, let’s get modding!
Tools You Will Need
Caseback Remover

There are a lot of different caseback removers, just as there are different casebacks out there. It can be a friction ball, it may look like a wrench, or it may look like a blade. Make sure to use the right one for your watch to avoid scratches and damage.
Slotted Head Screwdriver

For illustration only, you'll need one with a much smaller tip than this.
The screw holding down the rotor in place has a straight line slot, and can have different widths depending on the exact movement you are working on. Find a screwdriver with an edge that perfectly fits the screw if possible, as too much thickness or thinness can both cause problems.
Tweezers, Pegwood, and Finger Cots

You will not be directly touching the rotor at any time. You will use the tweezer to lift up the rotor once disengaged, and the pegwood or finger cots are needed to finely adjust or test the rotor once it has been reinserted into the movement.
Rodico

You might be regularly cleaning your workspace and using an air conditioner to reduce dust, and you can be as careful as you can with handling the parts, and you will still get prints and dirt on your rotor. Rodico will help you clean your movement before closing the watch back up.
Step by Step Instructions to Change the Rotor
1. Remove the Caseback

As car guys say: pop the hood. Source: Gear Patrol
We will assume that you are using a screwing watch caseback, which is the most common type for divers watches. If this is your first time removing the caseback, it will most likely be very tight for water resistance. If so, you may have to use a watch case holder, or a watch vice/clamp to hold down the watch while unscrewing the caseback with the remover tool. Align the pins of your remover tool to the notches on the caseback and twist counterclockwise. Once it loosens, you can continue unscrewing with your hands.
2. Remove Rotor

Steady hands required. Source: Wizard Watch on YT
The moment of truth: this part should be easy to do but you have to be delicate as you will be putting some force directly on the movement. You can choose to hold the watch as you are doing this, however, it is more recommended to have the watch sitting flat on a watch holder. This way, you can reliably hold the screwdriver to the rotor screw at a 90 degree angle and avoid slipping. The screw would be tight on the first try, so slowly apply turning pressure until it unscrews. Once over the resistance point, you can loosen your grip on the screwdriver and continue to unscrew.
You can then use your tweezers to lift and remove the rotor from the movement and set it aside.
3. Add on the new Rotor

Steady hands AND good aim required. Source: @Nafokies
Similar to how you removed the original rotor, you will be picking up your new rotor with tweezers and placing it on the movement. You will then gently screw in the central post to the point that the screwdriver stops rotating without tightening it yet. Use the pegwood to test if the rotor is engaging the gears correctly. Once you have confirmed that the rotor was properly placed, you can then proceed to tighten the central post. Don’t overdo it as you can damage the screw thread if you make it too tight!
4. Final Checks

You're almost done with the mod at this point. Source: Caliber Corner
Before putting your caseback back on, you may want to visually inspect the rotor and the rest of the movement for dust or prints that may have accidentally gotten there during the rotor swap. You won’t be able to appreciate your new rotor if it looks dirty, so give it a quick clean with a hand pump or Rodico cleaning putty before adding on your caseback.
Rotor Installation Issues to Watch Out For:
- If the rotor rotates but the watch is not being wound up, the gear must not be properly engaged. Try removing the rotor and putting it back on again.
- If the rotor is noisy or makes scratching sounds when you shake it, the central post is loose and must be tightened.
Namoki Rotors to Choose From
Now that you know how easy it is to swap the rotors of your movement, here are some choices for your rotor-swap:
At the time of this publishing, we have two half-circle rotors inspired by Eastern and Western design.

First up is the Great Wave movement rotor, which features the popular Japanese Seigaiha pattern. It is used to symbolise oceans and seas on old maps, and also stands for power and resistance. A beautiful design for any Seiko watch.

We also have the Cote de Geneve movement rotor or the striped pattern (also known as Geneva Stripes), commonly found in Swiss-made movements. The subtle stripes are a sure way to enhance your movement without being too distracting!

We have also recently released our Snowflake rotors which come as a full, asymmetrical circle, inspired by the skeletal rotor found on the Bell & Ross BR05. The industrial look adds heft to any movement, and will be a beauty to look at through a sapphire display caseback.
Wrap Up
Rotor swaps is one of the easier mods to do for your watch that makes it perfect for beginners, while also having a noticeable impact on your timepiece. There are few steps to follow and room for error, so if you already have a display caseback to see inside your watch, the next step is to make the view more enticing with a rotor upgrade!
That said, and as with any modifications, you still need to be careful while handling the watch since you are using sharp tools and working on the movement, AKA the thing that powers your watch.
If you liked this guide, be sure to share this to other people who might be interested in modding their watch rotors too! And if there’s anything you would like to add, please share them in the comments below.
Comments
John said:
What screwdriver would work for this? Can you provide dimensions needed or a link to a screwdriver that would be best for this?